(Affiliate links marked with *)
I’ve been talking for several weeks about lots of different aspects of yoga, and it occurred to me that some of you might want to start doing yoga, but you’re not sure how.
Going to a yoga studio can be overwhelming, and for some people it can be much too expensive. I get that! Group classes at your local gym are also an option. While they’re usually a bit less intimidating, I know you still have to be a paying member to participate.
If yoga studios and gym classes are unappealing or out of your budget, doing yoga at home is a totally viable option, even if you’re a brand-new beginner.
Getting Started at Home: What You’ll Need
Honestly, you don’t need much to start doing yoga in your house. To make things as easy and comfortable on you as possible though, I highly recommend investing in a couple of things.
- Yoga Mat
The first is a yoga mat. Yes, you can do yoga on carpet or hardwood, but having the extra cushion and grip of a mat will make a huge difference in how you feel. This is especially true if you have any kind of joint problems, or you’re learning how to do basic poses.
You don’t have to spend a lot, either! There are plenty of great mats that are less than $25, and some that are less than $15. Amazon Prime is my personal preference for shopping in general, so I’ll include a few links to mats that I’ve tried and liked.
I suggest getting a mat that’s a minimum of 6mm (~1/4 inch) thick. I actually like for a mat to be as thick as possible for extra knee cushion, but I feel like less than 6mm offers no support at all.
It’s also important to get a mat that’s grippy. Exercise mats will not work for yoga! You need one that specifically says that it’s sticky, non-slip or intended for yoga.

I like mats that are rated “tree frog feet” sticky. Trust me on this. I’ve used non-sticky mats before and nothing is more distracting and irritating than constantly having to readjust your hands and feet because you or your mat are sliding around on the floor.
Here are a few mat suggestions at various price points to get you started!
- Gaiam Essentials Premium Mat* – This was my first mat! It’s inexpensive, functional and comes in lots of colors. It loses its stickiness over time, but it’s good to start with and will still last a couple of years.
- IUGA Fitness Mat + Alignment Lines* – I really like the texture on this mat. I get sweaty pretty easily, but the extra texture helps keep my hands and feet stable. I also like the alignment lines! They’re a nice little bonus that’s helpful if you aren’t in front of a mirror.
- Manduka Pro* – This is the mat I have. I don’t recommend running out and splurging on this mat until you’ve decided on a steady, committed yoga practice because it’s on the upper end of the price range. I do love mine though, and it will last you forever!
- Support Blocks
Support blocks probably seem like an unnecessary extra step, but trust me on this. They’re good for the relaxation portion of your practice, but they can also be the difference between struggling and hating a pose or feeling stable and comfortable.
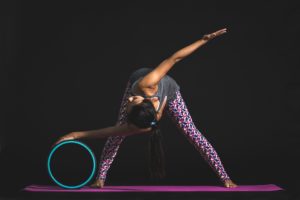
She’s using a yoga wheel to deepen the pose, but she could also use a block to deepen the stretch or increase stability. If you’re particularly long-limbed or willowy, you may be fine without blocks because you likely won’t need as much help touching the ground. If you’re short or want some extra stability, blocks will likely help you more.
I’m picky about my blocks, but I’ll link you to a few different styles so that you can decide for yourself what’s best.
I prefer blocks that are wide, thick and pretty firm (we’re talking about yoga blocks here people, get your mind out of the gutter!), but I know not everyone does.
- Gaiam foam blocks* – These are the blocks I have! They’re the perfect thickness, and the foam is dense enough for support without being so dense it hurts if you use them for relaxation poses.
- Forbidden Road cork blocks* – These are a bit narrower and closer to the ground than the Gaiam blocks, and the cork offers a bit more “give.”
- bamboo support bricks* – These are obviously very rigid, and they’re lacquered, so they aren’t non-slip. However, they do look pretty, and they’re great if you want blocks that absolutely will not bend, warp or compress!
Bonus: If you’re interested in learning more about yoga wheels, this one* is similar to the one in the photo. They’re really interesting tools!
Finding the Right Routines
You can do a Google or YouTube search for beginner routines, or you can look for things like “shoulder relief yoga” or whatever your specific need is at that moment. Doing this will return a ton of results, and there are plenty of good ones to try. It will take some trial and error to figure out what kind of pacing you prefer and which types of instructors you feel most comfortable following.
I’ve done plenty of yoga this way, and it works just fine! However, I’m going to offer an alternative for anyone with an Apple or Android phone.
The Daily Yoga app is my favorite way to find new yoga routines
It’s an app called Daily Yoga, and I absolutely love it. It’s free, but you can upgrade to a paid membership at any point. Even if you stick with just the free version, you get a huge catalog of yoga routines for just about any goal imaginable.
If you decide to pay for the premium version, you get a massive wealth of knowledge in addition to an expanded library of routine videos! I highly recommend the premium version, especially for beginners, simply because there are so many easy-to-search databases for things like basic pose mechanics and asanas. You get access to coaching and targeted workshops too!
(I’m not affiliated with them, and I don’t gain anything from you signing up! I just really like the app, and I think it’s such a cool concept.)
You Can Do It!
Yoga doesn’t have to be an expensive investment or an overwhelming time sink. I hope this post helped to make the getting started part a little easier.

Do you have questions I didn’t answer? Let me know in the comments!